Showing posts with label Gardening. Show all posts

Saturday, April 11, 2009

Gardening Diary - Transfer The Plants

It's weekend and time to visit parent-in-laws. My guru told me to bring my babies yesterday in the phone, say there's some activity for me. Good! Because I starting to get panic that, some of my Pot Marigold babies are start to bend down instead of heading up which; happened the same at my first blindly seedling trial (source said this flower need a bit extra care during growing period). Secondly, a bunch of China Aster are gathered in 1 small area instead of spreading equally in the pot.

Always, there is a warm welcome waiting for us whenever we visit to parent's house. That is why I love to come here. Further more, Mutsi is very surprised to see my babies have been growing so well. After a delicious lunch, we start to look into relocate the babies without further delay.

Material needed:

1. Separate pot(s)/vase(s)
2. Plant's stick with sharp head(I used ice cream stick at home because I don't have plant stick)
3. Soil
4. Old newspaper

First started with my Pot Marigold~~

1. Use news paper to close the holes of the pot, to avoid soil from escaping.
2. My guru+mother-in-law = Mutsi (and cute looking!)
3. Now use the stick go under the soil deeply and carefully push the soil up. Here some of the roots might get broken (because they are tight up and messy underneath) and have to throw the plant(s) away if it does. So have to be very careful.


4. When transfer to another pot, try to bury plants a bit deeper into the soil. Mutsi did until only the leaves are on top and... Done!
5. Back to the long pot, we need to add soil to support the 'armies' standing straight and up. I feel bad when many plants has to bury under the soil fully but Mutsi said it is ok. They will find their way up. They were born from soil anyway.


Before and after. So huge different [Poor babies :( ]
6. Now we need to manage the traffic in the China Aster pot. Use the stick or finger to make a hole before bury them into soil.
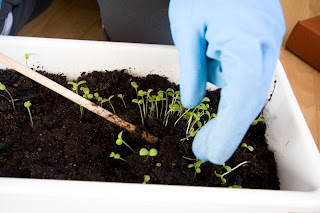
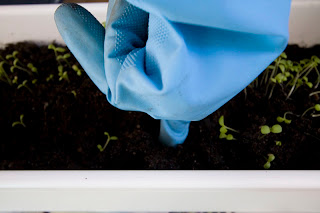
7. Mission accomplished!

Well done!!!

There is no need to rush to water the plant. Let them get use to the new change for 1-2 days then only pour with little water. From now on, every alternate or 2 days with little water is sufficient. Oh don't forget to move them to balcony for sun bathing, reminder from Mutsi. :)

EXPERIMENT & RESULT
I killed a lot of babies iceberg lettuce when I did the transfer back at home. One of the reason due to too many water previously, that the soil was so wet also there is something like a piece of flat wood under the soil and caused all the roots are tie up together thus hard to separate them. Anyway, lesson learned that actually no need to water them everyday. Besides, I tried to replant (transfer) those without root (I was very careless, only the head left :P), with root only no head as well as those broke to half with top part 'hanging' with bottom. Plants are amazing, they will tell you whether they can survive or not right on the next morning. As a result, of course they can't survive without root, the 'root only' is struggling to survive and the broken one; very unlikely can survive too.
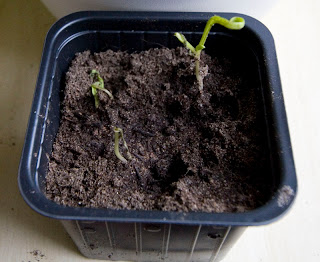
Top left is the one without root and dying, the healthy one on right and hope that the bottom one (root only) able to regrow in the new environment.


I trust that I have learned all this knowledge in school however, I have returned it to teacher since the day I left the school :P. Anyway, some knowledge is good the learn through experience than to memorized from book.


Gardening Diary - Planting The Seeds (The Seedling)

Whenever I say: Ok, I want to do this., then I will start to do a lot of research from the internet, books and ask the expert to make i do it right. As a beginner in gardening, I realised that maybe it is good for me to record my trials and errors in my own term as future reference. Because, information is just within a few clicks but we don't really digest it until we try it. Besides, it always and still happened to me that: "I have already do 100% according to the instruction but why the result is different?".

This idea came yesterday, 10 April 2009; first thing when I woke up. I was so happy to see my babies has been growing very well since the seedling last Saturday and I think I am ready to start planting in new pot without any help. Therefore, here's the beginning.

First of all, I need to prepare the planting materials as following:

1. Portable seedling box with transparent lid or, I use the plastic container as the base that used
to package the meats by supermarket and cover it with transparent food wrapper later.
Note : The base of the recycle plastic base has to be flat otherwise root(s) may somehow come out from the hole at the bottom of the pot. See my observation at the bottom.

2. Small plastic pot.

3. Well-drained soil. (I would describe it as dark brown soft mud, almost for all plants on earth)

4. Trowel (I only use my hand to grab the soil because it is small amount unless I need to fill into
hard reach edges)

5. Hand gloves (If don't want to get dirty. But sometimes is good with bare hands)

6. Old newspaper to cover the floor (if want to save the cleaning works, but still it will be all over)

Now I am ready with many wonders...

1. Add soil into the pot, about 2/3 of the pot.

2. Pour seeds into palm. Easy to distribute and avoid too much seeds if pour directly into pot.

Iceberg Lettuce. Small yet big contribution to us :)
3. How many seeds is ok in the pot? I'm wondering all the time because I don't know how big each plant will be. So I start up with 5-10 seeds first and labeled the different of seeds amount in each pot, as well as the name of the plant. (Well, a lot of works for a beginner)
4. After adding the seeds, slightly press them into the soil or, slightly cover them with some soils.
Babies need the blanket to keep warm :) No need to put them 6 ft. under the soil :P I really don't know where shall I put them into the soil the first time before Mutsi taught me, and was so afraid that they will be buried forever in the soil. Ha!


5. Watering. This part is always overdo by me as a new comer. Since here is a four season country, the plants no need to water all the time as well as the seeds. As long as the soil is wet (feel with fingers) it is enough for them to grow at the initial stage. I have once encountered that watering is hard to separate the plants' root when transferring to bigger pot though the plants survived with too much water. So no flooded the soil. Also, it was a bit challenging for me to pour the water with 'big mouth' water kettle. It will over pour!!! So I have to use my finger to help the water pouring. I think mist spray is good to avoid the over pouring but then the seeds will running around however it is ok. Just need to spray a bit far and slow and blanket the seeds again.
ops... too much water


6. Now I need to give the seeds another big shelter to keep the moist and warm - the transparent wrapping paper. Some source said that plastic bag also can but I prefer this because it is best to get the sunlight. I was so silly at the first time that, I afraid they will suffocate without having oxygen if I would keep it seal all the time so I keep on open and seal back the shelter. In fact they wouldn't, they are just seeds. Ha! Shame on me!
7. All ready and now just place them at a bright place with sufficient sun lights and water them daily (with very little water) or alternate day. I did 2 experiments: water daily or water them only on the first day with no water on next 2 days and they still grow. So either way but I prefer alternate day to avoid killing them with too much love and cares (this time is the real suffocation) :) Last but not least, clean the inevitable dirty floor!!!
8. As soon as the plants pop-up from seeds about 2cm with 2 leaves open widely then unseal the pot. Let them breath freely. Since their height is not reaching the shelter limit yet, I would wait until the rest of the seeds to pop-up before I unseal it because I am still not sure how well the seeds will grow without the shelter. Still under experiments anyway.

OBSERVATION & RESULT
To make sure the pot is steadily stay on a flat base. I transferred the baby spinach pot to green house box and let it stand on top of a hole (because the pot is bigger than the hole) for higher shelter space as some of them has grown tall and some still struggling to pop-up from seeds. The result was some roots even grown over the hole from the pot base and I have to transfer the particular baby spinach to a deeper pot.


I am glad that I found a way to recycle as I feel bad all the time to throw them away. So I started to collect them but, another thought in my mind was : I could probably collect more than 100 plastics in a year if I am keeping them all! According to hubby, there is no plastic recycling yet in Finland. I hope there is as soon as possible and if anybody know where is it available here, please tell me. Oh yes, don't forget to keep the film for future use once the babies no need the shelter. Please feel free to share your experience with me :)

Wednesday, April 8, 2009

Sun Tanned Day For Babies

Spring is about gardening and sun shining. For the first time, I felt so in love with sunshine which; it used to be my biggest threat in Malaysia because we have a big hot sun all year round. Besides, our mind has been poisoned by those advertisement (again it is advertisement!), what is worse than having imperfect skin and pigmentation on the face? But here, is a whole new meaning of sun shining. It means life, and bring life.

Gardening has been my new hobby, and I am very much obsess into it. I have been waiting for our sun father (when earth as mother) since Saturday. I felt myself like a mother now to take care of my plants. And I use 'babies' when talk to hubby. I can be really sad if I notice they are dying. Since then, I am no longer anxious about how dry is my skin every morning when I wake up instead; to check how well is my babies are growing. Luckily, I have a gardening guru - my mother-in-law to consult whenever I have doubts.

Today, sun is so shining, land is so brightening, birds are singing and plants are so awakening! It is about 7c outside in the balcony. Therefore, compared to seeing them grow healthy and faster, the hassle of moving them to balcony and back to house at sunset means nothing to me even though I have to do it everyday. Now let's see how my babies enjoy the kiss of the great father :)


Everybody is enjoying the splash of sun shining
The chicks love to have sun tan too. Luckily they didn't become roasted chicken
Prosperity in the (green) house


Sneak Preview


Wedding gift from Jaarno & Marit (hubby's bro & in-law)
I wish our love is shining forever <3>


~Who is that (obsessed) girl I see?~

Reminder from Mutsi : move them only when there is sun shining in the balcony. As now is still too cold to the babies (early Spring is around 2c-7c), it is better for them to stay inside the house if there is no sunshine, even the sky is bright but the sun is hiding. It is enough to put them near to a bright window.